
First let me get out the way the glaring problem of Python being a terrible language to make a Mandelbrot Set generator in. Mandelbrot Generators need speed to make the best possible images with the highest resolutions. Python, compared to a language such as C – which would be a much better language to program this project – is incredibly, incredibly slow to run. This is due to multiple things, mainly Python being an interpreted language meaning each line of code is compiled line as the program is executed, while a compiled language like C is converted into a binary file before runtime. The reason I used Python is because 1. I am a million times more competent with Python than any other programming language, and 2. Sufficient quality images can be acquired in Python in a relatively reasonable amount of time; good enough for this little experiment.
The Mandelbrot Set
The Mandelbrot Set is a set of numbers. A list of numbers which satisfy one rule. First, we must take the entire set of numbers, which in this case is a small area on the complex plain, with real numbers going along the x axis and imaginary numbers going up the y axis.

If you throw a dart onto the complex plain, the position that dart landed can be described by taking it’s position on the x dimension and y dimension and combining them together, this is a complex number; a number combining a real part and an imaginary part.
A Mandelbrot Set generator takes every position in this plain (every complex number), with certain bounds and a set level of fidelity, and applies this formula to it.
![\[Z_{n+1} = Z_n^2 + c\]](https://henrytechblog.com/wp-content/ql-cache/quicklatex.com-3ed624de4d9d47b2c24a42f65d9c90a2_l3.svg "Rendered by QuickLaTeX.com")
What this does is takes the number 0, square it, and add the current complex number to it. Then it does this again, but instead of Z being 0, Z is now the number which the last calculation created. This is repeated many times and this iteration will do one of two things. First, and true for basically all complex numbers save a few around 1 to 2 x or y on the plain the iteration will blow up as it is squared over and over again, so it will go off to infinity. However, due to the nature of mathematics, there are some numbers which do not spiral off into infinity, instead doing something far more remarkable. These numbers make a series of calculations which turn into a loop, they stabilise out into a repeated pattern of numbers that never expand to infinity. Complex numbers which do this are in the Mandelbrot Set.
So, if you repeat this process over and over again for many complex numbers you create a group of complex numbers which are in the set. But a list of numbers is not very interesting. The magic happens when you give the numbers a colour, most commonly black, and place them back onto the complex plain:

A fractal: a beautiful shape with infinite complexity buried in the reality of the universe.
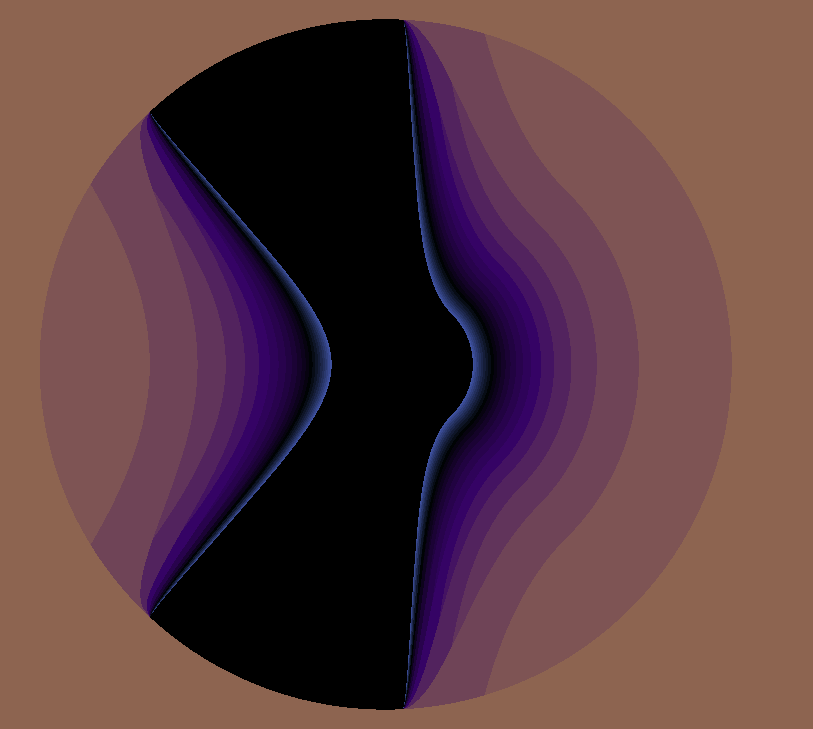
In addition to simply colouring the numbers that are in the set black, pixels can also be coloured by taking the number of iterations it took the program before the complex number began to increase to infinity, essentially a measurement of how “stable” that position is.
By simply subtracting the red and green values of the pixel by the iteration count multiplied by some arbitrary constant to give it more of an effect, a blue colouration can be given to the space around the set:

Going even further than this, a spectrum of colours can be mapped to the number of iterations, creating some brilliantly colourful sets.
The Mandelbrot set is just one of many fractals which can be made this way, playing around with the formula can yield some incredible results.

When you increase the power, the number of “bulbs” increases.


![\[\int\]](https://henrytechblog.com/wp-content/ql-cache/quicklatex.com-5ef9e122d09787bf2fda51d458f99a55_l3.svg "Rendered by QuickLaTeX.com")

![\[Z_{n+1} = Z_n^4 + c\]](https://henrytechblog.com/wp-content/ql-cache/quicklatex.com-107be6851db88b6e6ca0eb52dd30d5c3_l3.svg "Rendered by QuickLaTeX.com")


![\[0.25Z^2 + c + (Z^2 + c)-2\]](https://henrytechblog.com/wp-content/ql-cache/quicklatex.com-753f616667232fd3ae51557de3712abd_l3.svg "Rendered by QuickLaTeX.com")

![\[(-0.4 + 0.2i)cZ^2 + (-0.275i\div c)Z + c\]](https://henrytechblog.com/wp-content/ql-cache/quicklatex.com-6f318296d054dfe19dafa62c74192250_l3.svg "Rendered by QuickLaTeX.com")

![\[abs(Z^2) + c\]](https://henrytechblog.com/wp-content/ql-cache/quicklatex.com-324d641dce9f2051aba71474fa86f626_l3.svg "Rendered by QuickLaTeX.com")

![\[abs(Z)\div abs(c) + c\]](https://henrytechblog.com/wp-content/ql-cache/quicklatex.com-37f4c335b5e50bdfb9209239f07017c0_l3.svg "Rendered by QuickLaTeX.com")

![\[zlog(Z+1) + c\]](https://henrytechblog.com/wp-content/ql-cache/quicklatex.com-17f031851e66cd0b17639c4ce7ac4908_l3.svg "Rendered by QuickLaTeX.com")

![\[Z - (Z^8 + c)\div (8Z^6)\]](https://henrytechblog.com/wp-content/ql-cache/quicklatex.com-1b760536597ae5e95c8a4fa0963b0f10_l3.svg "Rendered by QuickLaTeX.com")

![\[sin(Z)c\]](https://henrytechblog.com/wp-content/ql-cache/quicklatex.com-aedccbb4f2a3aca50d44fe5d722a0023_l3.svg "Rendered by QuickLaTeX.com")


![\[cZ^2 + 1 + (cZ^2 + 1)^{-1}\]](https://henrytechblog.com/wp-content/ql-cache/quicklatex.com-2c58b6fc170b99220dbc46156e7c7338_l3.svg "Rendered by QuickLaTeX.com")

![\[sin(z+1) + abs(c)\]](https://henrytechblog.com/wp-content/ql-cache/quicklatex.com-5e3430e706249aeeda7e5e5c2d7d97d9_l3.svg "Rendered by QuickLaTeX.com")

![\[z + cos(z)^{sinh(c)}\]](https://henrytechblog.com/wp-content/ql-cache/quicklatex.com-8ba238c77c4dc30d4e05e7ed8733dbee_l3.svg "Rendered by QuickLaTeX.com")

![\[z + log(c)\]](https://henrytechblog.com/wp-content/ql-cache/quicklatex.com-fc41faf9dadce21afc6d6fc6ef5ac7eb_l3.svg "Rendered by QuickLaTeX.com")

![\[cot(Z^5)\times log2(c)\]](https://henrytechblog.com/wp-content/ql-cache/quicklatex.com-ff454d5eebbcb4457403e72448a04d79_l3.svg "Rendered by QuickLaTeX.com")

![\[cos(Z+c)\]](https://henrytechblog.com/wp-content/ql-cache/quicklatex.com-514d58ec315ad274cfa4d9354a17ef4d_l3.svg "Rendered by QuickLaTeX.com")

![\[sin(abs(Z)) + c\]](https://henrytechblog.com/wp-content/ql-cache/quicklatex.com-a44b5c3f5b0e53734ee15363b527e4cd_l3.svg "Rendered by QuickLaTeX.com")

![\[tan(sin(c) - sin(Z))\]](https://henrytechblog.com/wp-content/ql-cache/quicklatex.com-e726742779bbfc79de256c5173c172b5_l3.svg "Rendered by QuickLaTeX.com")

![\[abs(c) + Z^\pi\]](https://henrytechblog.com/wp-content/ql-cache/quicklatex.com-eb0275c74c4f4a7564d90e8458b00000_l3.svg "Rendered by QuickLaTeX.com")

![\[tan(abs(Z^2)) + c\]](https://henrytechblog.com/wp-content/ql-cache/quicklatex.com-59f97315527d49a09d22fcbac2770c6f_l3.svg "Rendered by QuickLaTeX.com")

![\[sin(abs(Z^2)) + c\]](https://henrytechblog.com/wp-content/ql-cache/quicklatex.com-03942abb7ca93bb004071723c91f0db8_l3.svg "Rendered by QuickLaTeX.com")

![\[cos(abs(Z^2)) + c\]](https://henrytechblog.com/wp-content/ql-cache/quicklatex.com-e105ec66d766f492fdbe7800daed4bb4_l3.svg "Rendered by QuickLaTeX.com")

![\[tan(abs(Z^2) + c)\]](https://henrytechblog.com/wp-content/ql-cache/quicklatex.com-df9c270e8ddfbcd74325782fc04c68ce_l3.svg "Rendered by QuickLaTeX.com")

![\[sin(abs(z^2) + c)\]](https://henrytechblog.com/wp-content/ql-cache/quicklatex.com-a24b203f315cb35de3be300259744e99_l3.svg "Rendered by QuickLaTeX.com")