![\[\int\]](https://henrytechblog.com/wp-content/ql-cache/quicklatex.com-5ef9e122d09787bf2fda51d458f99a55_l3.svg "Rendered by QuickLaTeX.com")
A gallery of fractals I made on the software Fractal Zoomer

![\[Z_{n+1} = Z_n^4 + c\]](https://henrytechblog.com/wp-content/ql-cache/quicklatex.com-107be6851db88b6e6ca0eb52dd30d5c3_l3.svg "Rendered by QuickLaTeX.com")


![\[0.25Z^2 + c + (Z^2 + c)-2\]](https://henrytechblog.com/wp-content/ql-cache/quicklatex.com-753f616667232fd3ae51557de3712abd_l3.svg "Rendered by QuickLaTeX.com")

![\[(-0.4 + 0.2i)cZ^2 + (-0.275i\div c)Z + c\]](https://henrytechblog.com/wp-content/ql-cache/quicklatex.com-6f318296d054dfe19dafa62c74192250_l3.svg "Rendered by QuickLaTeX.com")

![\[abs(Z^2) + c\]](https://henrytechblog.com/wp-content/ql-cache/quicklatex.com-324d641dce9f2051aba71474fa86f626_l3.svg "Rendered by QuickLaTeX.com")

![\[abs(Z)\div abs(c) + c\]](https://henrytechblog.com/wp-content/ql-cache/quicklatex.com-37f4c335b5e50bdfb9209239f07017c0_l3.svg "Rendered by QuickLaTeX.com")

![\[zlog(Z+1) + c\]](https://henrytechblog.com/wp-content/ql-cache/quicklatex.com-17f031851e66cd0b17639c4ce7ac4908_l3.svg "Rendered by QuickLaTeX.com")

![\[Z - (Z^8 + c)\div (8Z^6)\]](https://henrytechblog.com/wp-content/ql-cache/quicklatex.com-1b760536597ae5e95c8a4fa0963b0f10_l3.svg "Rendered by QuickLaTeX.com")

![\[sin(Z)c\]](https://henrytechblog.com/wp-content/ql-cache/quicklatex.com-aedccbb4f2a3aca50d44fe5d722a0023_l3.svg "Rendered by QuickLaTeX.com")


![\[cZ^2 + 1 + (cZ^2 + 1)^{-1}\]](https://henrytechblog.com/wp-content/ql-cache/quicklatex.com-2c58b6fc170b99220dbc46156e7c7338_l3.svg "Rendered by QuickLaTeX.com")

![\[sin(z+1) + abs(c)\]](https://henrytechblog.com/wp-content/ql-cache/quicklatex.com-5e3430e706249aeeda7e5e5c2d7d97d9_l3.svg "Rendered by QuickLaTeX.com")

![\[z + cos(z)^{sinh(c)}\]](https://henrytechblog.com/wp-content/ql-cache/quicklatex.com-8ba238c77c4dc30d4e05e7ed8733dbee_l3.svg "Rendered by QuickLaTeX.com")

![\[z + log(c)\]](https://henrytechblog.com/wp-content/ql-cache/quicklatex.com-fc41faf9dadce21afc6d6fc6ef5ac7eb_l3.svg "Rendered by QuickLaTeX.com")

![\[cot(Z^5)\times log2(c)\]](https://henrytechblog.com/wp-content/ql-cache/quicklatex.com-ff454d5eebbcb4457403e72448a04d79_l3.svg "Rendered by QuickLaTeX.com")

![\[cos(Z+c)\]](https://henrytechblog.com/wp-content/ql-cache/quicklatex.com-514d58ec315ad274cfa4d9354a17ef4d_l3.svg "Rendered by QuickLaTeX.com")

![\[sin(abs(Z)) + c\]](https://henrytechblog.com/wp-content/ql-cache/quicklatex.com-a44b5c3f5b0e53734ee15363b527e4cd_l3.svg "Rendered by QuickLaTeX.com")

![\[tan(sin(c) - sin(Z))\]](https://henrytechblog.com/wp-content/ql-cache/quicklatex.com-e726742779bbfc79de256c5173c172b5_l3.svg "Rendered by QuickLaTeX.com")

![\[abs(c) + Z^\pi\]](https://henrytechblog.com/wp-content/ql-cache/quicklatex.com-eb0275c74c4f4a7564d90e8458b00000_l3.svg "Rendered by QuickLaTeX.com")
12/9/21

![\[tan(abs(Z^2)) + c\]](https://henrytechblog.com/wp-content/ql-cache/quicklatex.com-59f97315527d49a09d22fcbac2770c6f_l3.svg "Rendered by QuickLaTeX.com")

![\[sin(abs(Z^2)) + c\]](https://henrytechblog.com/wp-content/ql-cache/quicklatex.com-03942abb7ca93bb004071723c91f0db8_l3.svg "Rendered by QuickLaTeX.com")

![\[cos(abs(Z^2)) + c\]](https://henrytechblog.com/wp-content/ql-cache/quicklatex.com-e105ec66d766f492fdbe7800daed4bb4_l3.svg "Rendered by QuickLaTeX.com")

![\[tan(abs(Z^2) + c)\]](https://henrytechblog.com/wp-content/ql-cache/quicklatex.com-df9c270e8ddfbcd74325782fc04c68ce_l3.svg "Rendered by QuickLaTeX.com")

![\[sin(abs(z^2) + c)\]](https://henrytechblog.com/wp-content/ql-cache/quicklatex.com-a24b203f315cb35de3be300259744e99_l3.svg "Rendered by QuickLaTeX.com")
A gallery of fractals I made on the software Fractal Zoomer
12/9/21
I created this website to display the many programming/electronics projects I have done over the last 3 years.
Here is how I made it.
Going into the project, I already had a little experience setting up websites. I had made my own HTML website in the past and had explored using Jekyll themes combined with Github Pages to create a nice little website. The experience making the Jekyll website was admittedly quite painful at times due to my lack of understanding in the realm of web design and full-stack development.

My aim for this time round was to make a simple website where I could easily create posts to create a record of projects I do in my free time, while most importantly, not becoming the disorganised mess resembling my last website. By this point, I had heard of WordPress, and was not really sure what it did or how to use it. I did know however that it was used to create exactly what I wanted on this website – something I stumbled across from YouTube.
So I began researching WordPress, discovering its two types: wordpress.org and wordpress.com. I was determined however to spend nothing on this website, so I strayed away from wordpress.com where almost everything is hidden behind a paywall.
I already had an old computer lying around so I wanted to use that as the server for the website rather than paying for third party webhosting (despite it costing very little to set up a small site). Unfortunately the population of helpful WordPress tutorials online seemed to be predominantly aimed at the paying version of WordPress, which didn’t speed things up. I did find this tutorial however, which was brilliant to get me set up but did create quite a few problems later along the line due to it being quite old and out of date.
After running into a few problems where I foolishly decided to change tutorials and installed something which confused my database software, I managed to get onto the WordPress dashboard. I began to explore and was really impressed with the ease of use of the software, and how everything was organised very well – something my last website was dearly missing.

Far too much time was spent on the Themes page, where I scrolled for ages looking for the perfect layout for my website. After trying a few, I began to make a few realisations. Firstly, it seemed all the themes I wanted to use where created by 3rd party companies which all had links to their own websites presenting new paywalls to unlock the full suite of functionality on their template. Another thing which bugged me was sometimes when activating a new template, an entire library of plugins where installed to satisfy the template’s requirements, making me feel even more overwhelmed by the enormous amount of pages and configuration on the WordPress dashboard.
For this reason, I decided to pick the inbuilt “Twenty Nineteen” WordPress theme, the exact same as the website previously mentioned. I really liked this theme due to its simplicity and lack of hidden paywalls due to being an inbuilt theme. Admittedly, this theme is probably very overused so to make myself a bit more unique I will undoubtedly change it in the future.
Now to buy a domain – the only thing I was forced to spend money on in this entire project. I bought the domain henrytechblog.com domain from Google Domains for £10/year and connected it up to my IP.

My website was nearly ready to go but there was one annoying thing I wanted to fix and that was the site was using the HTTP protocol rather than the far, far more secure HTTPS protocol. This meant my browser displayed a little “Not Secure” icon next to the URL – not very professional.
Going into this, I was under the impression all I had to do was flip a switch on my Apache web server, and it would start to use the safer protocol. This, it turned out, was very far from the truth. I immediately discovered that to make your site use HTTPS, you needed a TLS certificate, in order for browsers to guarantee the site was not faking it’s use of HTTPS. One of these certificates can cost from £25 – 200, a sum I certainly was not ready to pay.

Due to HTTPS effecting sites ranking in search engines, this creates an unhealthy bias against small companies which cannot afford to pay for these certificates. Enter Let’s Encrypt, a non-profit company set up to tackle this problem by basically just giving out free TLS certificates.
From there I was pointed to Certbot, an ACME client which uses Let’s Encrypt’s services to automatically applies a TLS certificate to your server, and keep it up to date. The process after that was satisfyingly simple, all I had to do was follow the tutorial on Certbot’s website, and after some brief confusion where I forgot to change my port forward to use the 443 port (default for HTTPS), I had my website using the new web protocol.
I am now in the process of creating articles for all the projects I have done in the past. Now, thanks to the ease of use of WordPress, I will be able to make pages on my website for the projects I do, as I do them, so they can go into more depth and detail. The future vision of this website is a platform for me to upload my experiences so they are easily accessible, and easy to give to potential jobs or universities as evidence of experience in certain areas.
Thanks for reading
I started this project back in the first national lockdown, a period of time where I was off school for around 6 months. The majority of my days were spent waking up, sitting at my computer, then going back to bed, with the occasional visit to the kitchen for peanut butter on toast. This allowed me an incredible amount of time to do things such as program, and this game is one of the things which came out of that.
I programmed Peanut Butter Simulator over the course of about a week during my holiday from start to finish, and worked at it for so long each day it practically turned into a full time job.
At first my idea was to make an idle game virus-related (inspired by the ongoing global pandemic), where the gamer would evolve and grow their virus to become stronger and more lethal, sort of like the game Plague Inc. I quickly realised however that it probably was not the best time to create a game about killing as many people as possible with a virus while such atrocities where ravishing the plant. Thus Peanut Butter Simulator was born.
Inspired by my worryingly high consumption of peanut butter during those lockdown days, Peanut Butter Simulator would be a light-hearted and humorous idle/clicker game with the basic premise being: click the jar of peanut butter – get money – upgrade peanut butter.
The main inspiration for the game was Egg Inc. A mobile app where start by running a humble chicken farm, until egg technology grows and the world discovers new, powerful eggs which also happen to be worth more, allowing to grow your farm to insane levels. Eggs included in Egg Inc. consist of: Graviton Egg, Terraform Egg, Quantum Egg, etc.
I also wanted to be a clicker game, meaning you have to click on the graphic in the centre of the screen to get money.
Peanut Butter Simulator was created using the Python programming language, and a videogame creation module call Pygame, which I had some prior experience with, but this was to be my biggest game by far.
Here are the features I implemented into the game.

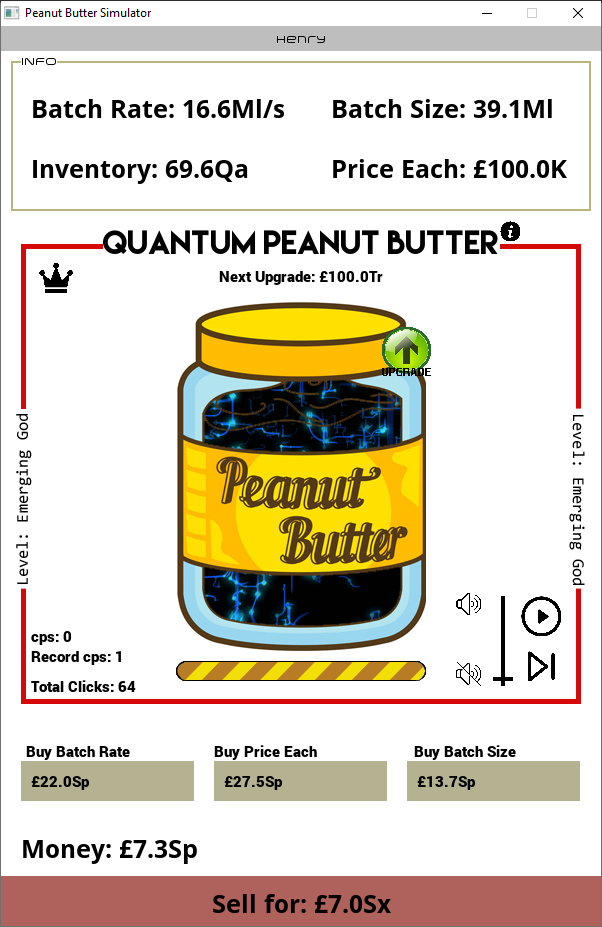
When you first open the game’s .exe file, you will be greeted by this very slapdash welcome screen, where you are prompted to input a username (the use of which will be detailed later).

You start the game with the least valuable peanut butter, regular peanut butter. There are 3 main variables which determine how much money you make in the game: Price Each (PE), Batch Size (BS) and Batch Rate (BR). In addition, there is a variable holding Inventory (the amount of jars of Peanut Butters you have produced), and a money variable.
To gain inventory, click the jar or wait to passively gain a batch. To gain money from your inventory, click the red button at the bottom of the window, where it displays the amount of money you will gain (calculated with PE * Inventory). Money is then displayed above the sell button.
The three main variables for the making money can be upgraded with the three buttons above the money reading.
The cost and increase for each time you upgrade is calculated as follows:
Price: Calculated buy multiplying the last price by 4, apart from every 3rd upgrade, which is * 5
Increase: calculated by running a Fibonacci algorithm on the starting value.
There was very little mathematical testing on how these formulas work together to make the game not take days to complete and equally not spiral off too quickly thus making the game take too little time to complete. I found while creating this game that this goldilocks zone where the numbers do not blow up is quite a hard thing to create, and I admittedly did not spend very long fine tuning it, something I should definitely do if I were to go back to it.
The amount of money needed to upgrade your peanut butter to the next level is displayed below the main peanut butter name, in this case, being £100k. Once you have enough money to upgrade to the next level an upgrade button will appear in the top right of the jar.

This fun little feature shows how many times you are clicking the jar every second, your record for how many times you have clicked the jar, and the total times you have clicked the jar.

A random little extra I added to the project near the end. This feature plays some of my favourite video game and film music from over the years so my friends could bop out to a bit of Skyrim’s Dragonborn while playing Peanut Butter Sim. Comes with a pause and play button, a skip track button and a volume slider.

A little I icon next to the name of the peanut butter leads to a screen with a bunch of text on, depicting the back story of the universe in which you are running your peanut butter business. The idea was to create one of these stories for each of the peanut butters in the game, creating a rich story, but I only ever did the first few.

Another feature in the game is the global leader board. So my mates could compare each other’s progress in the game, I connected the game up to a server I ran off my PC, which collected and distributed all the users money data, displaying it to everyone playing the game in a ranking, using the username system described earlier. Unfortunately I cannot show the leader board screen as that would require setting up the server again which I’m not doing right now.
When you exit the game, a very simple save game feature is ran, where a dictionary is dumped into a text file including the level of all your upgrades, your money etc. The eval() function is then ran when the game is started again to restore the game to it’s previous state. This is a very insecure way of doing this and my friends very quickly figured out they could easily edit the text file to give themselves as much money as they wanted.
Finally, I used a piece of software to bundle my code and modules up into a nice little .exe file and created an installer so I could stick my game on my google drive and distribute to friends.


Pig is a simple game of luck and gamble, where two players take turns to roll a dice. On a player’s go, they add the number on the dice to their score for that go. If they land on 1, their score for that go is set to 0 and it becomes the other player’s turn. Before each roll, the player can decide if they want to “stick” or roll again. If they choose to stick, their score for that go gets added to their overall score. The aim of the game is to have a higher score than your opponent at the end of n rounds.
I broke this game down into 3 parts.
p1 = 0
p2 = 0

rounds = 10

playing = True
draw = False
winner = "NONE"

# Mainloop

for r in range(1, rounds + 1):
    print("-----Round %d-----" % r)
    print("Player 1 score: %i" % p1)
    print("Player 2 score: %i" % p2)

    p1 += move("p1")
    p2 += move("p2")

if p1 > p2:
    winner = "p1"

elif p2 > p1:
    winner = "p2"
else:
    draw = True

if draw:
    print("-----DRAW-----")
    print("Player 1 score: %i" % p1)
    print("Player 2 score: %i" % p2)

else:
    print(f"----{winner} WINS-----")
    print("Player 1 score: %i" % p1)
    print("Player 2 score: %i" % p2)
I broke this game down into 3 parts.
Part 1
Part one is the structure of the game. This includes the main loop, adding to the players’ overall scores and printing the winner at the end.
def move(player):
    rolling = True
    die = 0
    round_score = 0
    rolls = 0

    # User
    if player == "p1":
        print("\n---YOUR GO---\n")
        while rolling:
            op = input("Do you want to roll (r) or stick (s)?")

            if op.lower().strip() == "r":
                die = random.randint(1, 6)  # Creating the random number
                round_score += die
                print("\nThe dice landed on %i!" % die)

                rolls += 1

                if die == 1 and rolls != 1:
                    print("0 points for this round!\n")
                    return 0

                print("Total for this round: %d" % round_score, "\n")

            else:
                print("You got %d points for this round!" % round_score, "\n")
                return round_score
Part 2
Part 2 is where the player inputs their decisions into the game. You can choose to roll (r) or stick (s).
        # Computer

        print("\n---COMPUTER'S GO---\n")

        while rolling:
            time.sleep(1)
            die = random.randint(1, 6)
            round_score += die
            rolls += 1

            print("The computer landed on %i" % die)

            if die == 1 and rolls != 1:  # Cannot get out on the first go
                print("0 points for this round!\n")
                return 0

            print("The computer's total is %i" % round_score, "\n")

            v = (round_score / rolls) / 6  # Getting the value

            prob = (rolls ** (v * 4)) / 50  # Getting the probability

            if random.random() < prob:
                print("The computer has decided to stick\n")
                return round_score

            time.sleep(1)
Part 3
Part 3 is the complicated bit. It is where the computer decides what it wants to do. It uses a formula to calculate a probability on whether it will stick or not.
I mostly used trial and error to make this formula, as I have no idea what numbers change what so I just messed around with it until it looked good. A website that really helped was https://www.desmos.com/calculator. This is a really great website that plots a line representing a formula that you can specify and change. It also has “sliders” so you can quickly change values and see the result.

To make this formula I started breaking down the game to decide on some simple rules you can follow to maximise your score. At the end of the day this game is luck however you can make certain decisions that increase your point gains. Firstly:
For example, if you roll three 6s in a row, that is really lucky so you are not going to want to waste that. Inversely:
This is a general trend however sometimes if you are getting unlucky, you might just want to stick with what you have and not risk the few points you do have.
To resemble this this certain degree of luck, I made a variable called “V”, or “Value”. This variable is a simple percentage (shown as 0 to 1), that shows how lucky your series of rolls are. For example, 6 is absolute maximum value so that will give you a 1, further rolls will change this value for example if you roll a 3 that will bring you down do v = 0.75. This is how I calculated this:
Where:
![\[V = {round\_score \div rolls \over 6}\]](https://henrytechblog.com/wp-content/ql-cache/quicklatex.com-a2058eddbfa197abc20e6965c5be9151_l3.svg "Rendered by QuickLaTeX.com")
This gives you the average score, as a number between 1 and 0. This is only one piece of the puzzle however, as this does not take into account the general rule of:
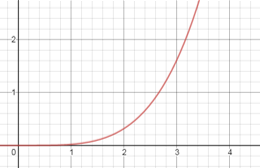
So, I needed to use this value and bring in the number of rolls into account. I started messing around on the quadratic line plotter. I used a slider and the variable “v” to test how the graph changes as the value changes. This is the formula I got:
![\[y = {x^{v*4} \over 50}\]](https://henrytechblog.com/wp-content/ql-cache/quicklatex.com-08bd1cb7bb865b3bdf2ce3dabe9b33f2_l3.svg "Rendered by QuickLaTeX.com")
These numbers make a line that can be used to give the computer a probability of sticking. This is much more accurate and rewarding than linearly changing the probability.
This is how it works:

The number of rolls are shown on the x axis along the bottom and the probability is derived from the y. The computer picks a random number from 0 to 1. If it is below the y value produced by this graph, the computer sticks. So the more space under the line between 1 and 0 show the higher the probability of sticking. Of course, if the line goes above 1, the computer will always stick as there is a 100% chance of it being under the line.
When you move the slider for v, the line responds.

At v = 0.6, the slope’s gradient becomes more gradual. This allows for the computer to take more rolls.

At v = 0.4, the gradient is very shallow so the computer will roll more.
This was the first formula that I looked at and said “that looks alright”, so I wasn’t expecting much. I reckoned it was a bit too subtle and not daring enough to be accurate to human decision. I definitely expected to go through a couple more generations before I got it right. So, as you might imagine, I was very surprised when the computer beat me on my first game. It then went onto beat my friend on it’s second game, both times it looked like we were going to win, but then the computer comes back in the final few rounds. We then went on to beat it three times in a row, proving that it was not completely unbeatable. At home it beat my dad, in the same late game clutch as it had done twice before.
I have got to admit I was very impressed with my program! However, there is a lot that can be improved. This game is based almost solely on luck, so I think I had got the probabilities just good enough so that luck could tip it over the edge for the win. There is still a lot more room for improvement however, as the computer did make some questionable decisions here and there.
There was a situation in one of the games the computer lost. It was the final round, and the computer was about 10 points behind the player. It was the computers go. First roll: 3… And it stuck. Admittedly, there is a pretty low chance of the computer sticking after just rolling 3, but it does flag up a problem in the logic. In order for the computer to win it must have rolled a score which meant it beat the opponent. So, what a human would do is think, “I might as well keep rolling until it means I can beat the opponent as the only other option is a loss”. This is something that I can program in at a later date.
While I was making the formula, I thought of some other methods of helping the computer decide whether to stick or to roll. On of these methods was the “target number” method, where, the computer would roll until it got to a good amount, say 14, and then stick, this would ensure that the computer always tries to get a good sum of points. Also, there should be a way of fining the “sweet spot”. This would be a number with the highest probability to size ratio. Put simply, the biggest number the computer has a good probability of getting.
Taking this method further, you could add in an element of competitiveness. Perhaps, tell the computer that it always has to beat the what the opponent got for their turn. This could backfire however because the player could get a very low number; there’d be no point stooping to that goes’ level when there’s valuable points to be getting earnt to put the computer ahead of its competition.
Hiding behind this seemingly simple game of luck, there is a single, mathematically correct way of playing the game, a way that puts you at the absolute best chances of winning the game. This, is what I intend to find out. There are two ways I see, of finding this optimum method. One, you could do it completely mathematically, using probability and calculations to find the best method. Secondly, the much more fun method, is letting the computer itself decide what the best way of playing the game. I would need to find a way of the computer playing pig with itself over and over again, thousands of times a second, a way of measuring reward – so it knows what went well and what did not go so well, and a way of recording and somehow condensing the data the computer gathers so it can use that data to improve its own strategies.

I expect the computer to come up with some seemingly bizarre “best way” of playing the game, that at first seems completely wrong to humans. For example, “roll 4 every single time” or something strange like that. I think the computer will come up with something like this (that does not look right to humans) because the computer has no bias or misleading instincts that may give humans a disadvantage. The computer understands no aspect of “luck” or getting “unlucky”. All it sees is a probability. And will not be influenced by the feeling of “aww I’m getting so unlucky, lets stick now”. Fundamentally this is what will allow the computer to find a better algorithm than a human, the best algorithm.